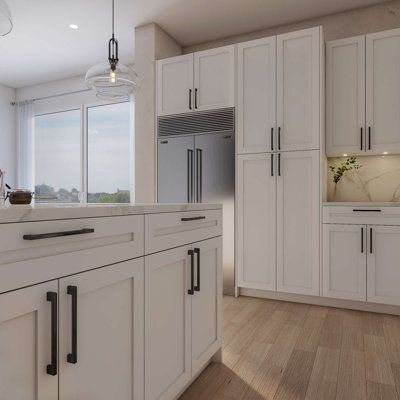
Refreshing your kitchen or bathroom can dramatically change your home’s atmosphere. One of the easiest and most effective ways to achieve this is by updating your cabinets with Residential Cabinet Painting Florida. Cabinets take up significant visual space in a room, so a makeover instantly improves aesthetics. Many homeowners overlook this simple yet impactful step. By investing time in cabinet refinishing, you can enhance your home’s value and appearance. Small details, such as smooth finishes and well-chosen colors, create a polished, modern look. A thoughtful cabinet update adds charm, elegance, and functionality. Proper care before painting ensures long-lasting results and prevents peeling or chipping. This simple upgrade can completely transform your space.
Why Choose a Professional Cabinet Makeover
When considering a cabinet update, it’s often best to hire Florida Superior Painting. Experts provide high-quality finishes that are difficult to replicate at home. They use professional tools, durable paints, and proper techniques for smooth results. A professional also saves time and prevents mistakes that can cost more later. Hiring a trained team ensures even application, precise edges, and lasting durability. Additionally, they can recommend color trends that match your home’s style. This professional approach avoids common DIY problems, including uneven surfaces, drips, or peeling paint. A professional cabinet makeover is an investment in quality, style, and long-term satisfaction. It also guarantees a fresh, modern look that stays beautiful.
Planning Your Cabinet Makeover
Before painting, planning is essential for a successful cabinet project. Start by evaluating the cabinet condition, noting scratches, dents, or worn areas. Choose the right color scheme that complements your home’s decor. Lighter shades can make small kitchens appear larger, while darker tones create a bold, elegant feel. Decide whether you will refinish, repaint, or replace hardware for a complete transformation. Proper measurement ensures the right amount of paint and materials. Clean and prep surfaces thoroughly to remove grease or dust. Sanding the cabinets creates a smooth texture for paint adhesion. Investing time in planning prevents mistakes and guarantees a beautiful result. A well-thought-out plan ensures a seamless, professional finish.
Choosing the Right Paint and Tools
Selecting the correct paint and tools is critical for a successful cabinet update. High-quality, durable paints withstand daily wear and maintain their vibrant appearance. Semi-gloss or satin finishes are ideal for kitchens and bathrooms due to moisture resistance. Use brushes, rollers, and sprayers suitable for the paint type for a smooth finish. Painter’s tape protects walls and countertops from accidental spills or streaks. Proper brushes and rollers prevent streaks, bubbles, and uneven layers. Applying multiple thin coats ensures better coverage and durability. Professional-grade primers improve paint adhesion and prevent peeling over time. A careful selection of materials and tools guarantees a lasting, visually appealing cabinet makeover.
Steps to Refresh Your Cabinets
Refreshing cabinets requires patience and proper technique for long-lasting results. Start by removing doors, drawers, and hardware for a complete, clean workspace. Sand all surfaces lightly to improve paint adhesion and prevent rough textures. Apply a quality primer to seal surfaces and create uniform coverage. Paint cabinets using smooth strokes in the same direction to avoid streaks. Allow each coat to dry completely before applying the next layer. Replace hardware or consider modern handles for a fresh appearance. After painting, inspect cabinets for missed spots or uneven areas. Reattach doors and drawers carefully for precise alignment. Following these steps ensures a professional, durable, and beautiful finish.
Maintaining Your Newly Painted Cabinets
Once cabinets are painted, proper maintenance prolongs their lifespan and keeps them looking new. Use soft cloths or sponges to clean surfaces gently without scratching. Avoid harsh chemicals that can damage the paint finish or cause discoloration. Wipe spills immediately to prevent stains from settling on the surface. Regular dusting prevents dirt buildup and maintains smooth textures. Inspect cabinets periodically for scratches, chips, or peeling paint. Minor touch-ups can prevent larger issues and keep cabinets pristine. Avoid hanging heavy items on doors to reduce stress on hinges. Consistent maintenance ensures your cabinet makeover remains vibrant, functional, and attractive over time.
Frequently Asked Questions
Q1. How long does a cabinet makeover take?
Most cabinet painting projects take between three to seven days.
Q2. Can I paint cabinets myself or hire a professional?
DIY is possible, but professionals provide smoother, durable, and lasting results.
Q3. Which paint finish is best for kitchens?
Semi-gloss or satin finishes resist moisture and are easy to clean.
Q4. Do I need to remove cabinet doors before painting?
Removing doors ensures smooth application and prevents paint from uneven coverage.
Q5. How do I maintain newly painted cabinets?
Clean gently with soft cloths and avoid harsh chemicals or scrubbing.
Final Thoughts
A cabinet makeover is one of the most impactful home improvements. It refreshes your kitchen or bathroom without requiring a full renovation. By choosing the right colors, finishes, and techniques, homeowners can achieve a modern, stylish look. Hiring a professional ensures flawless results and saves time while providing expert advice. Proper planning, preparation, and maintenance guarantee cabinets remain beautiful for years. From selecting paint to applying finishing touches, every step contributes to a polished appearance. Updating cabinets is an affordable way to enhance your home’s aesthetics and increase value. Start your cabinet makeover today and transform your home effortlessly.